How To Install Carpet Under Baseboard Heaters
Baseboard heating works through convection. As cold air falls from the window, it enters the baseboard unit through a vent. Within the baseboard, the air is warmed by a series of metal fins that have been heated through electricity. The warm air then rises from the baseboard, and the pattern repeats itself.
Winter's on the way and one of the most popular forms of supplemental heating is a. Not only are they effective but they're so subtle and provide an even flow of heat most people have come to appreciate. Some of the benefits include:. Easy maintenance. Zonal heating. Low profile design.
Low operating temperatures. Neutral colors. Extremely quiet. Temperature accuracy within 1-2 degrees of settings.
Step 6: Installing the Heater into Place The last step is to hold the baseboard heater into place and use the 2 inch drywall screws for securing it into place. Experts advise installing the screws directly into the wall studs for heightened support.
Safe choice with built-in thermal cut out. Draft-free heating.
- Many baseboard heaters can be installed directly on the floor without impeding airflow through the bottom of the heater. Heater units typically have a guard that prevents the air intake area from touching the floor. This design allows you to install the heater so it replaces a portion of the baseboard trim.
- Install the end cap from the top sliding the back left tab on the end cap behind the existing metal enclosure, and the front edge of end cap outside of the front cover. When fully seated, the top tab on the back of the end cap will slide between the tab on the rear of the front cover and the face of the wall.
Fins for widespread coverageInstalling a baseboard heater is simple. There are two brands that we carry requiring hardwire installation, Cadet and QMark. First, we'll review Cadet.
Determine where you want to install the heater. The seam at the junction of the wall and floor behind the heater should be caulked to prevent dust from being drawn into the room.The heater should also be flush against the surface of the wall. Place it either under a window, along an outside wall, or as close as possible to an outside door. Do not install heater beneath an electrical outlet.The heater may sit directly on any floor surface, including carpet. Do not allow the carpet to block lower air intake located 1 inch from the bottom. Be sure it is clear of all obstructions and that there is a 12 inch clearance between the heater and drapes.2. Determine which side of the baseboard you plan to wire.
It can be wired to the right or to the left of the unit. You must locate supply wires before mounting the heater.3. Verify that the electrical supply wires are the same voltage as the heater. For example, 120V heater to a 120V power supply. Locate wall studs closest to the supply wires and position the heater against the wall.5.
Remove the wiring compartment cover by removing the screw.6. Remove the slotted knockout closest to the supply wires and install a strain relief connector.7. Mount the heater securely to the wall with nails or screws. They must go into at least two wall studs. The back of the heater has star punch dimples that allow nails or screw to pierce the sheet metal.8.
Connect the grounding lead to the grounding screw. Both sides of the heater include a grounding screw.9. Double check the wiring to be sure the electrical supply wires are the same voltage as the heater. If wiring on the left, disconnect factory connector A. If wiring on the right, disconnect factory connector B. Only disconnect one factory connector.10. For standard baseboard wring on the right or left 120V or 240V supply.
Connect one supply wire to one heater wire. Connect remaining supply wire to remaining heater wire. Replace wiring compartment cover and secure with screw previously removed. Turn power back on at the electrical panel board.
For 2000 watt applications: Connect the remaining supply wire to the remaining black wire. Leave the red wire disconnected and cap loose end with an approved wire connector, or wrap loose end with electrical tape. Replace wiring compartment cover and secure with screw previously removed. Turn power back on at the electrical panel boardIf you're looking at how to hardwire a baseboard heater, you probably want to install a thermostat as well. Below are some instructions on how to setup your thermostat.1. Single pole wall thermostat. Route supply wires to the thermostat wiring box if not already present.
Connect one supply wire to one thermostat wire marked L1. Route remaining thermostat wire marked T1 to the baseboard heater. Route remaining supply and ground wire to the baseboard heater.Follow the installation instructions above for mounting and wiring your baseboard heater and you're all set!2. Double pole wall thermostat. Route supply wires to the thermostat wiring box if not already present. Connect one supply wire to one thermostat wire marked L1. Connect remaining supply wire to other thermostat wire marked L2.
Route remaining thermostat wires marked T1 and T2 to the baseboard heater. Route ground wire to the baseboard heater.Follow installation instructions for mounting and wiring your baseboard heater and you're good to go! Decide where you want to install the heater.
Do not install heater against vinyl wallpaper, paperboard, or low-density fiberboard surface. For best results, place the heater under a window.Mount the heater flush against the wall.
If need be, remove molding. If you want to replace the molding after installation, be sure to allow 1/16' clearance between the heater's end and the molding.Do not install heater beneath an electrical outlet.
The heater may sit directly on any floor surface, including carpet. Be sure the heater is clear of all obstructions and that there is a 6 inch clearance between the heater and drapes. Mark the location on the wall or floor for the power supply entry into the heater. Set the heater aside and drill an appropriately sized hole into the wall or floor. The baseboard heater can be wired to the left or the right.
Remove the left or right junction box end cap by removing the screw at the end of the heater and sliding the cap off.3. Verify that the electrical supply wires are the same voltage as the heater. For example, 120V heater to a 120V power supply.4. Remove the front cover of the heater by removing the screws located in the lower corners. Pull the bottom of the cover outward and lift the top of the cover off the junction box.
How To Install Vinyl Baseboard
Remove the top of the cover off the center bracket and off the immediate supports.5. Remove the appropriate electrical knockout from the back of the heater and thermostat accessory if needed. The supply wiring can enter the raceway without using a knockout if needed.Please note: The power supply must enter the heater through the knockout in the back of the heater if installed above the floor. Locate wall studs closest to the supply wires and position the heater against the wall.
How To Lay Carpet Without Baseboards
You can use a stud finder to do this. Drill punch or use a nail driver to put holes through the back enclosure at stud locations.
The heater includes nail point marks showing correct locations for mounting holes.8. Connect supply wire to the heater. Remove the wirenut and connect heater leads individually to power supply leads.Please note: Do not remove permanently crimped wires.9. Replace the front cover by fitting the top lip of the cover onto the tabs of each junction box and top edge of the element support brackets. Rotate the cover downward, pushing the bottom corners inward.
How To Protect Baseboards When Installing Carpet
Install two screws through the cover into the junction boxes. Be sure the bottom of the cover connects to each bottom support bracket.10. Replace the end caps and secure with screws.Use this guide in conjunction with the manufacturer installation instructions, and you'll have your heater up and running in no time.
Replace or install carpet to make a room appear brand-new. Even better, you can save money by doing the job yourself.
Love it or hate it, there are at least a few good reasons that homeowners choose carpeting today. For one, it absorbs the sound produced by television sets and stereo systems, overenthusiastic dogs, and raucous children. For another, carpet provides a soft, comfortable surface upon which to walk. And since it’s available in countless colors and patterns, carpeting can complement the decor of virtually any room. It can be somewhat challenging to install carpet, but with patience, preparation, and a some specialized tools, you can do the job yourself for a fraction of what it would cost to hire a professional.
Path of diablo reddit. Taking room measurements
Start by determining the square footage of the room in which you wish to install carpet. (To do this, simply multiply the room’s width by its length.) To be certain that you buy enough material, add 10 to 20 percent to your square footage calculation. Your carpet dealer can let you know whether you are neglecting any details; so that he can offer you the best advice possible, bring a sketch of the room’s layout to the store when you’re ready to choose a carpet.
Preparing the surface
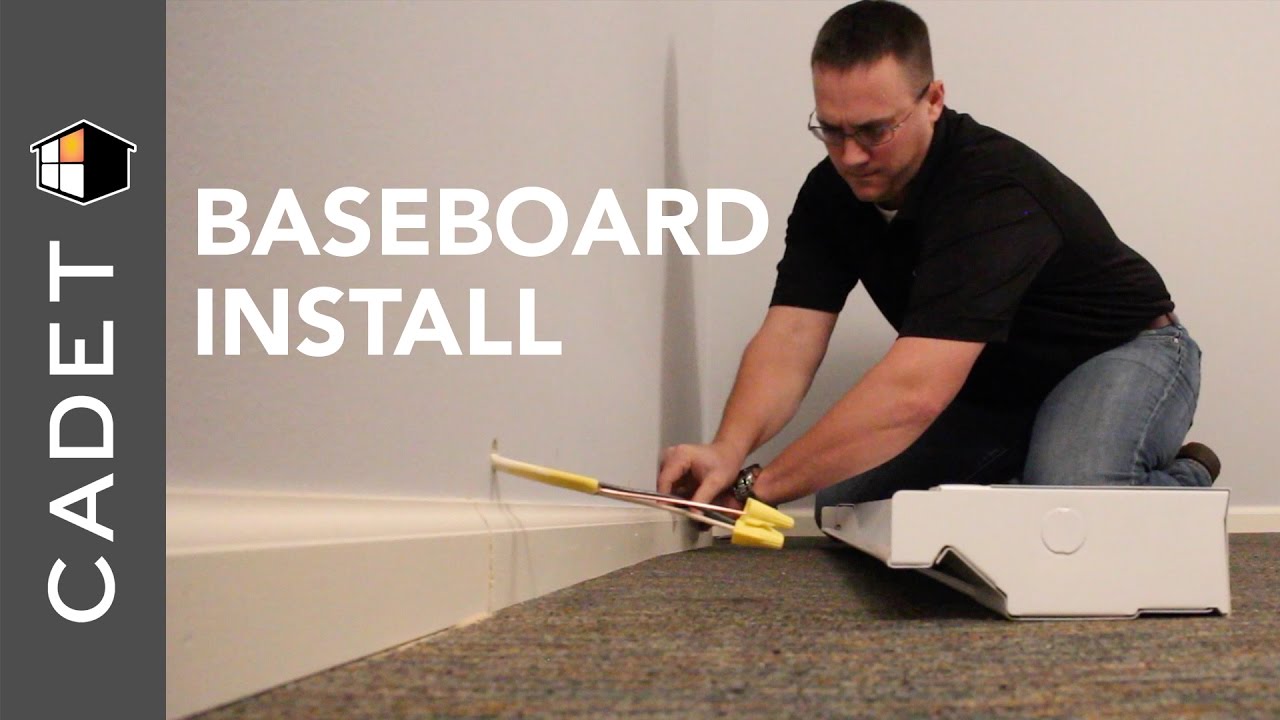
Sweep and vacuum the floor thoroughly, taking this opportunity to check for damage to the floor that will lie beneath the carpet. Smooth out the surface by removing any globs of glue, errant nails, or built-up paint. Depending on the design of the room, it may be wise or even strictly necessary to remove doors and baseboard molding so that your carpeting fits squarely against all edges. (Replacing old wall-to-wall carpet? You can probably install the new carpet without having to take off the baseboards first.) The floor should be totally dry before you proceed, as residual moisture can lead to mold growth.
Nail down tack strips
If you are planning to install carpet with a pad, then you don’t need to use glue, but you do need to install tack strips around the perimeter (minus the doorways). Later, when the carpet has been laid, these tack strips will hold the carpet in place. For now, position the strips about a half-inch from the wall, with the tacks angling away from the center of the room. When you’re purchasing those tack strips, by the way, there’s a simple rule of thumb to remember: Wider is better.
Advertisement
Related: Installing Carpet (VIDEO)
Turnitin free. Photo: shutterstock.com
Aim to put two nails into each tack strip, butting one strip against the other, end to end. Once you have placed tack strips around the entire room, even around obstructions like air vents, move on to install the carpet pad. Cutting the sizes needed as you work, staple down the padding every two feet along the inside edge of the tack strips. Trim back any excess padding with a utility knife, and duct tape the seams between padding panels until you have covered the floor.
Laying the carpet
Before you put down recently purchased carpeting, give the material at least 24 hours to acclimate to the conditions of your home. During this time, the carpet may shrink or expand slightly, and allowing this to happen prior to installation helps you ensure professional-level results.
Seaming tape is used to join two or more sections of carpet. Apply the tape underneath the carpet seam, adhesive side up. That adhesive melts under a seaming iron (which you can rent from your local home improvement center, along with other specialized tools). As the adhesive cools, press down on the carpet edges you are connecting. Next, seal the seam with a carpet roller. If possible, try to locate seams in low-traffic or otherwise inconspicuous parts of the room you are carpeting.
Beginning in a corner, attach the carpeting to the tack strips using a knee kicker, which prevents lumps and bumps from forming. Then head over to the opposite side of the room, stretching and pulling the carpet along with you. (If the room dimensions warrant one, a power stretcher makes easier work of positioning the carpet). Continue to use the knee kicker as you secure the carpet over the tack strips. Cut away excess with a utility knife (or wall trimmer), and finish by fitting the carpet under the baseboards, if you didn’t remove them earlier. If you did remove the baseboards, reattach them now.
Finally, kick off your shoes and enjoy a luxurious stroll across your newly installed floor covering!
- понедельник 30 марта
- 16